How to Complete Setup for GA4 and Remove the Red Notification Bar

Setting up Google Analytics 4 (GA4) can be a bit of a daunting task for beginners. In our previous blog post, The Ultimate Guide to Google Analytics GA4 Setup for Beginners, we walked you through the steps to create your GA4 account and connect it to your website. Now, let's dive deeper into how to complete the basic GA4 setup to ensure that you're getting the most out of this powerful analytics tool.
Understanding the Red “Incomplete” Bar
The presence of a red bar at the top of your Google Analytics dashboard saying your account setup is incomplete can be puzzling, especially for newcomers. This can be confusing because you just created the account and are likely wondering what more is there to set up. But don't worry. It’s not difficult; we're here to guide you through it. In this section, we'll demystify this issue.
If you still see a red bar at the top of your Google Analytics dashboard with a “Complete Setup” message, this signals that Google Analytics is ready to connect with other tools and features now that your account has been created. For getting set up with the basics, we'll simplify this process to remove the red bar and get you up and running smoothly.

Please Note:
The setup we'll cover in this post is just the beginning. You can always expand and customize your GA4 setup as your needs evolve.
How to Complete Basic GA4 Setup
To get started, click the Complete setup button in the red bar at the top of the Google Analytics Dashboard. This will take you to the Setup Assistant.
Section 1: Start Data Collection
This section should already have a green check mark because the data stream was connected in the first step of creating your GA4 account. If this section does not show a green check, go back to the Beginner's Guide to GA4 blog and complete those steps first.

Section 2: Customize Data Collection and Display
This section will not have green check marks yet, we will work through that in this section.

Google Signals
Check the circle next to the left of Turn on Google signals. Google Signals is a tool used to support personalize ads, utilize tracking users who have signed in to Google across multiple devices and platforms, and create a much bigger picture of data with additional features.
This may sound great, but if you are a beginner at Google Analytics and a small business, it is in your best interest NOT to turn this on. If you have less than the monthly average of 500 users per day, and if you turn on Google Signals, you will reach a data threshold, meaning you will have limited access to information found in your reports.
According to Google, “Data thresholds are applied to prevent anyone viewing a report or exploration from inferring the identity or sensitive information of individual users based on demographics, interests, or other signals present in the data.” Ultimately, this is a safeguard to follow data compliance.
Conversions
Check the circle next to the left of Set up conversions.
This is a more complicated part of the setup, and we’ll likely share about this in a different blog post. Depending on how you set up the business objectives when setting up the account, you may see a conversion already set up. This is the default setup, and there is no need to change it at this time. If or when you want to track the most important actions as “conversions” on your website, this is where you do it. This will be the most important goal you have for the website, this could be a form submission, a purchase, scheduling a call, etc.
Just for your own knowledge and to get you used to the terminology, there are also actions called “events.” These are to mark specific user interactions as more high-funnel actions. All events are tracked, but not all events are conversions. Conversions are the most important pieces, originally “goals” in the previous version of Google Analytics. It is a lower funnel action.
While setting up conversions is essential for tracking specific actions, we'll keep it simple for now, but rest assured, it's a topic we'll cover later. So go ahead and check that green circle to mark this as complete. You can go back to it and update it at a later time.
Audiences
Check the circle next to the left of Define audiences. The default setup is set to all users and purchasers (this may be slightly different depending on what business objective you selected when creating the account). Whatever shows as your default audience, leave it as is for now. Audiences are crucial for targeted marketing ads, but we'll stick with the default settings as beginners.
There you go, you should have all 3 Customize Data Collection and Display Sections checked. Let's move on to the next section.

Section 3: Link Google Ads
This section will not have green check marks yet, we will work through that in this section.

Check all three circles next to the left of Link to Google Ads, Bid on GA4 conversions, and Target ads for GA4 audiences.
We are marking these as complete because Google Ads is a whole other topic that requires a way deeper dive in another blog (or likely multiple), and in this blog, we are addressing more of the basics for Google Analytics beginner/basic users in the digital marketing realm.
By chance, if you DO already have Google Ads setup, you can go ahead and click the > next to each line and follow the step-by-step instructions to get these connected. You can also read more about Google Ads here and how to link Google Analytics to Google Ads here.
There you go. You should have all 3 Link Google Ads Sections checked. Let's move on to the final section.

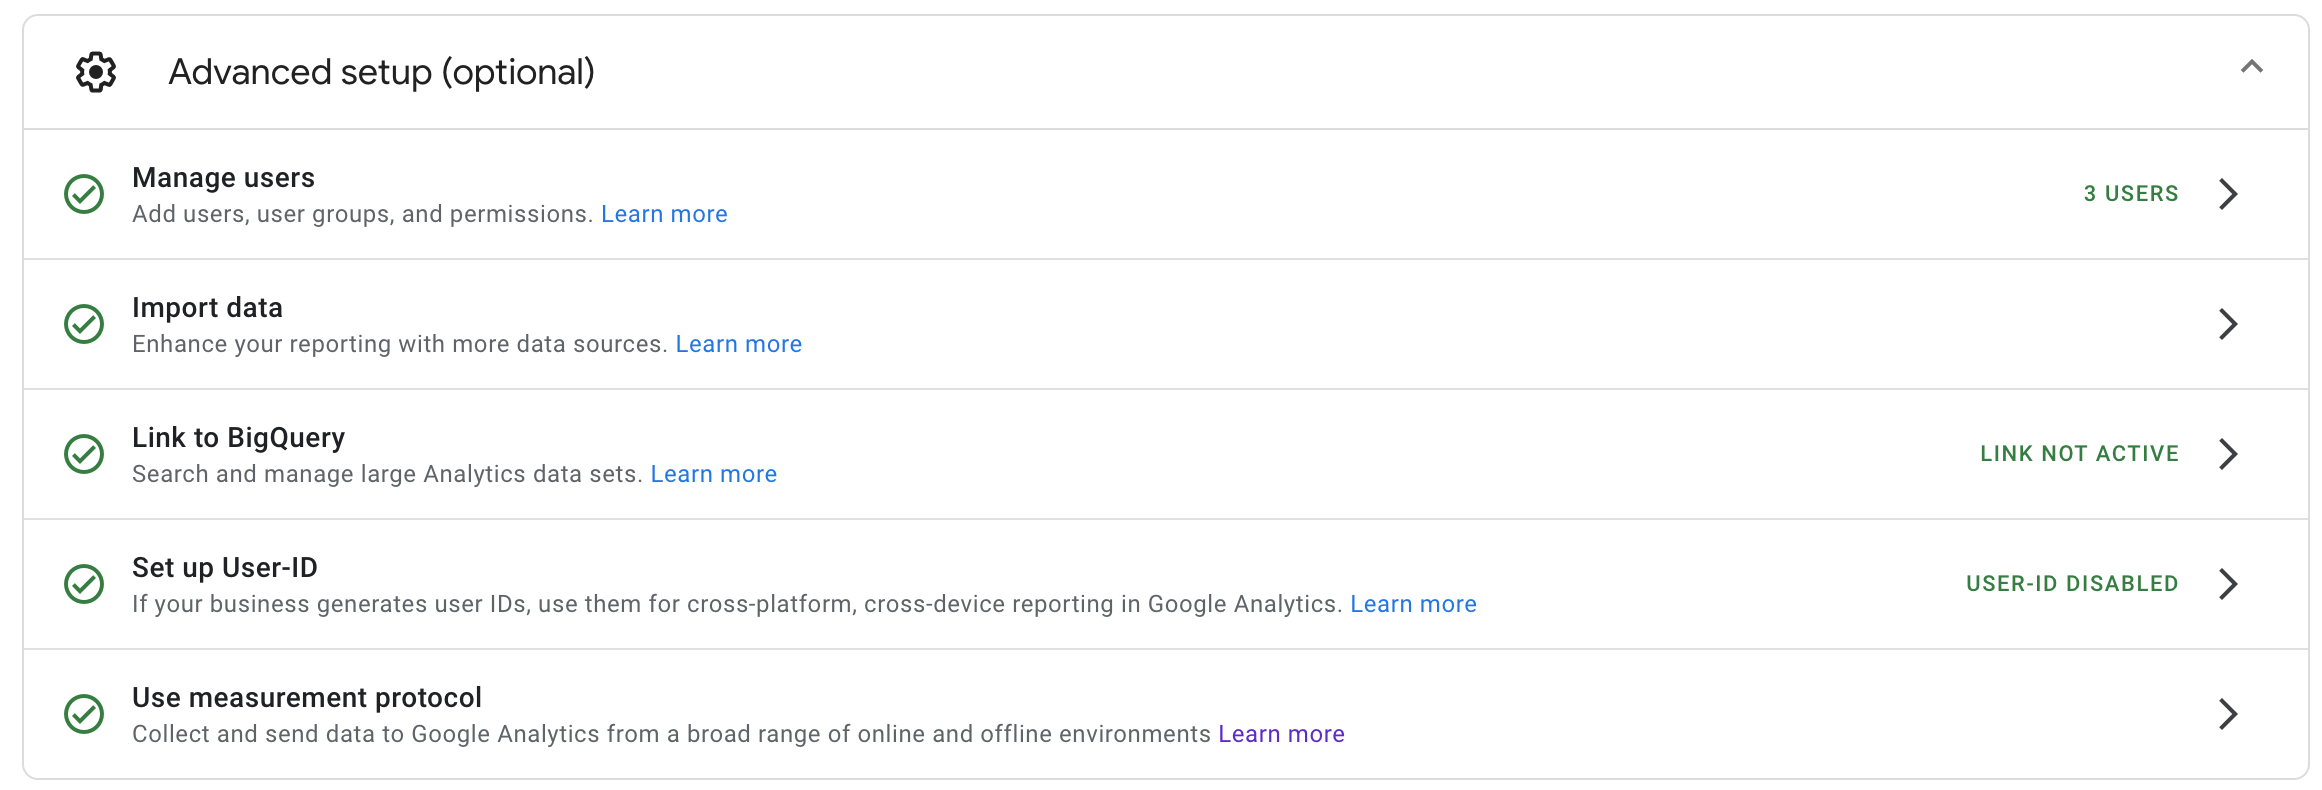
Section 4: Advanced Setup (optional)
Select the dropdown arrow to open this section. This section will not have green check marks yet. Let’s work through this together.

Manage users
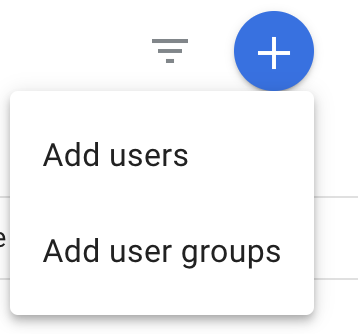
This is the only section that we’ll do something within this blog. This is where you can start adding user access and permissions within your GA4 account. Click the > arrow and click Manage users. Then click the blue + circle and click Add users.
Once you’ve added all the necessary users whom you want to have access to your Google Analytics account, X out of this section and go back into the Setup Assistant for this property.

You can go back and edit any of the users at any time by going to Admin, and under the property you want to change user access, click into Property Access Management.
For the remaining 4 items in the Setup Assistant, check all of the circles next to the left of Import data, Link to BigQuery, Setup up User-ID, Use measurement protocol. These require more advanced setups, which can be done later on. So, to complete this beginner’s setup and to get the red bar at the top of the dashboard to go away, we are checking them all.
If you’d like to learn more about these options, click the Learn more next to each.
While you may initially encounter a red bar at the top of your GA4 dashboard, following these steps should help it go away.
Congratulations, your basic GA4 setup is now complete, and you're on your way to gaining valuable insights into your website's performance and user behavior. Remember, GA4 can grow with you as your needs evolve, allowing for more advanced configurations and in-depth analysis. Happy tracking!
P.S. If you ever encounter challenges while completing your GA4 setup or have questions about maximizing the potential of Google Analytics, our dedicated team is just a click away. Don't hesitate to reach out for expert guidance. Let's chat, and together, we'll ensure your GA4 journey is smooth and successful, from setup to insightful analysis.

More soon,
Jessica
MARKETING + OFFICE COORDINATOR
P.P.S.
Subscribe to get our weekly blog with marketing, business, and finance tips dropped straight into your inbox.


